Deployment with Gradio
![]()

Table of contents
- Introduction to Gradio
- Examples
- Example 1: Hello World with Gradio
- Example 2: Multiple Inputs with Gradio
- Example 3: Interacting with a Gradio App via Client
- Example 4: Applying Filter to Images
- Example 5: Image Classification
- Example 6: Batch Image Classification
- Example 7: Deploying Apple’s Depth Pro Model using Gradio
- Example 8: Deploying a Chatbot
- TorchScript: A PyTorch Serialization Framework
- References
Introduction to Gradio
Gradio is an open-source Python library that makes it incredibly easy to build user-friendly web-based interfaces for machine learning models, APIs, or any Python function. With just a few lines of code, you can create interactive UIs that allow users to upload inputs, view model outputs, and share the interface through a simple web URL.
Why Do We Need Gradio?
Gradio is useful for:
- Rapid Prototyping:
- Gradio allows developers and data scientists to quickly create functional interfaces to test and demonstrate their models.
- Collaboration:
- By providing a shareable web link, Gradio makes it easy to collect feedback from teammates, stakeholders, or end-users without requiring complex setups.
- Ease of Use:
- It requires minimal coding and setup, making it ideal for quickly showcasing models or functions.
- Iterative Development:
- Testing and gathering feedback early in the development process helps improve models and ensures they meet user requirements.
- Accessibility:
- With no need for front-end development skills, Gradio bridges the gap between data science and end-user interaction.
Features of Gradio
- Interactive User Interfaces:
- Supports text, image, audio, video, and tabular inputs and outputs.
- Allows dynamic interaction with models in real-time.
- Shareable Web Links:
- Automatically generates a shareable URL (
share=True) to make your app accessible online.
- Automatically generates a shareable URL (
- Customizable:
- Fully customizable interfaces with various input/output components and layouts.
- Supports Various Use Cases:
- Ideal for machine learning demos, data exploration, and tool development.
- Fast Iterations:
- Lightweight framework that allows you to build and test prototypes in minutes.
Examples
Example 1: Hello World with Gradio
Code:
import gradio as gr
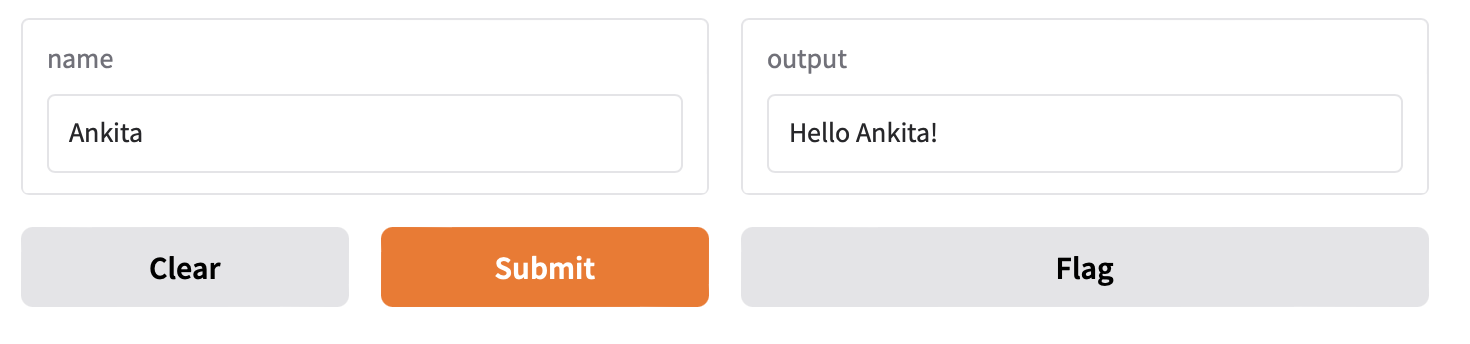
def greet(name):
return "Hello " + name + "!"
demo = gr.Interface(fn=greet, inputs="textbox", outputs="textbox")
demo.launch(share=True) # Share results with your friends with just 1 extra parameter 🚀
Result:
- Shareable via a public URL using
share=True.
Example 2: Multiple Inputs with Gradio
Code:
import gradio as gr
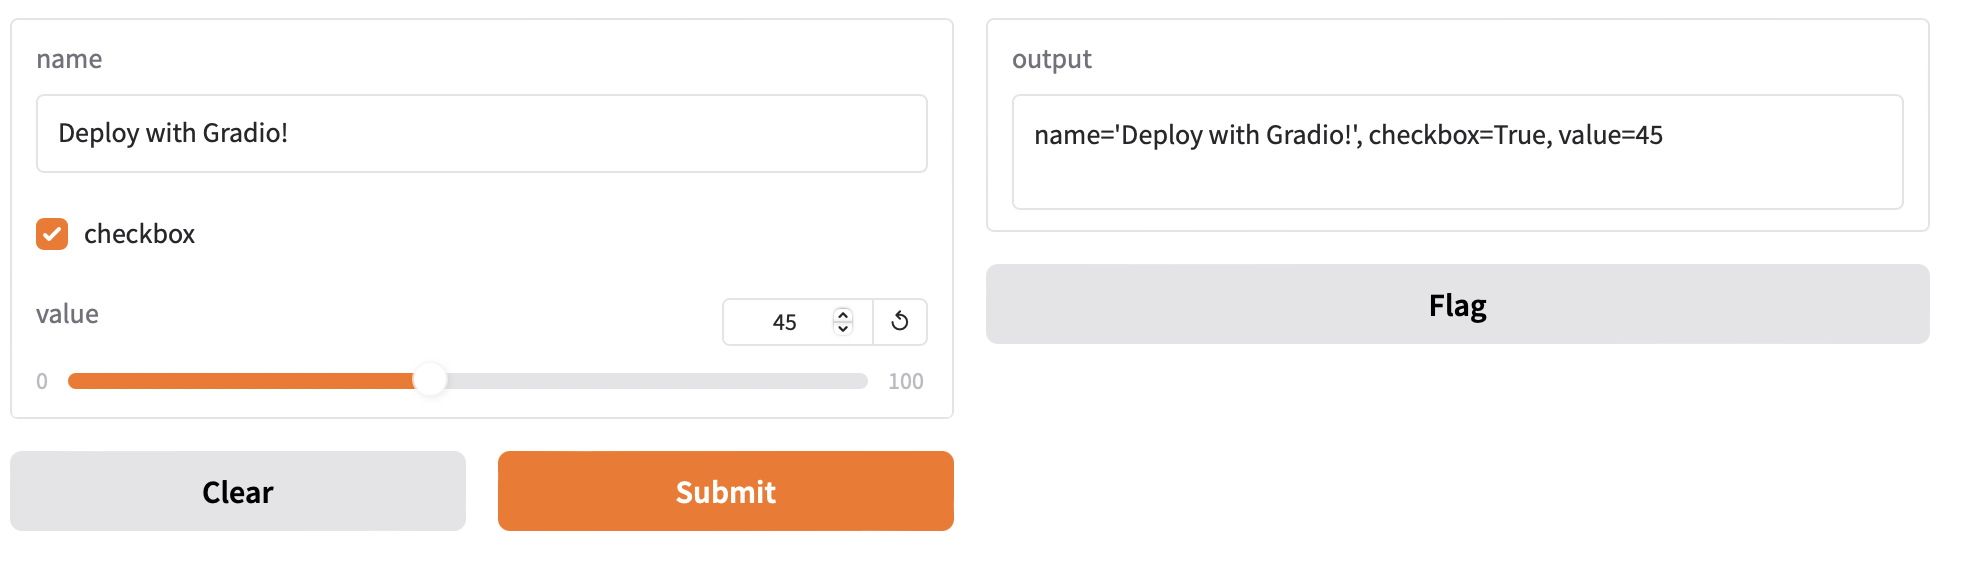
def test(name, checkbox, value):
return f"{name=}, {checkbox=}, {value=}"
demo = gr.Interface(fn=test, inputs=[gr.Text(), gr.Checkbox(), gr.Slider(0, 100)], outputs=gr.Text())
demo.launch()
Result:
- Interface with three input components:
- Text: Enter any string.
- Checkbox: Toggle between
TrueandFalse. - Slider: Select a value between 0 and 100.
Example 3: Interacting with a Gradio App via Client
Code:
# pip install gradio_client

from gradio_client import Client

client = Client("http://localhost:7860")
result = client.predict(
    "John",  # str  in 'name' Textbox component
    True,  # bool  in 'checkbox' Checkbox component
    # int | float (numeric value between 0 and 100) in 'value' Slider component
    0,
    api_name="/predict"
)
print(result)
Result:
- Demonstrates how to interact with a Gradio app programmatically using the Gradio Client.
- Sends inputs to the app running at
http://localhost:7860.
Loaded as API: http://localhost:7860/ ✔
name='John', checkbox=True, value=0
Example 4: Applying Filter to Images
Code:
import numpy as np
import gradio as gr
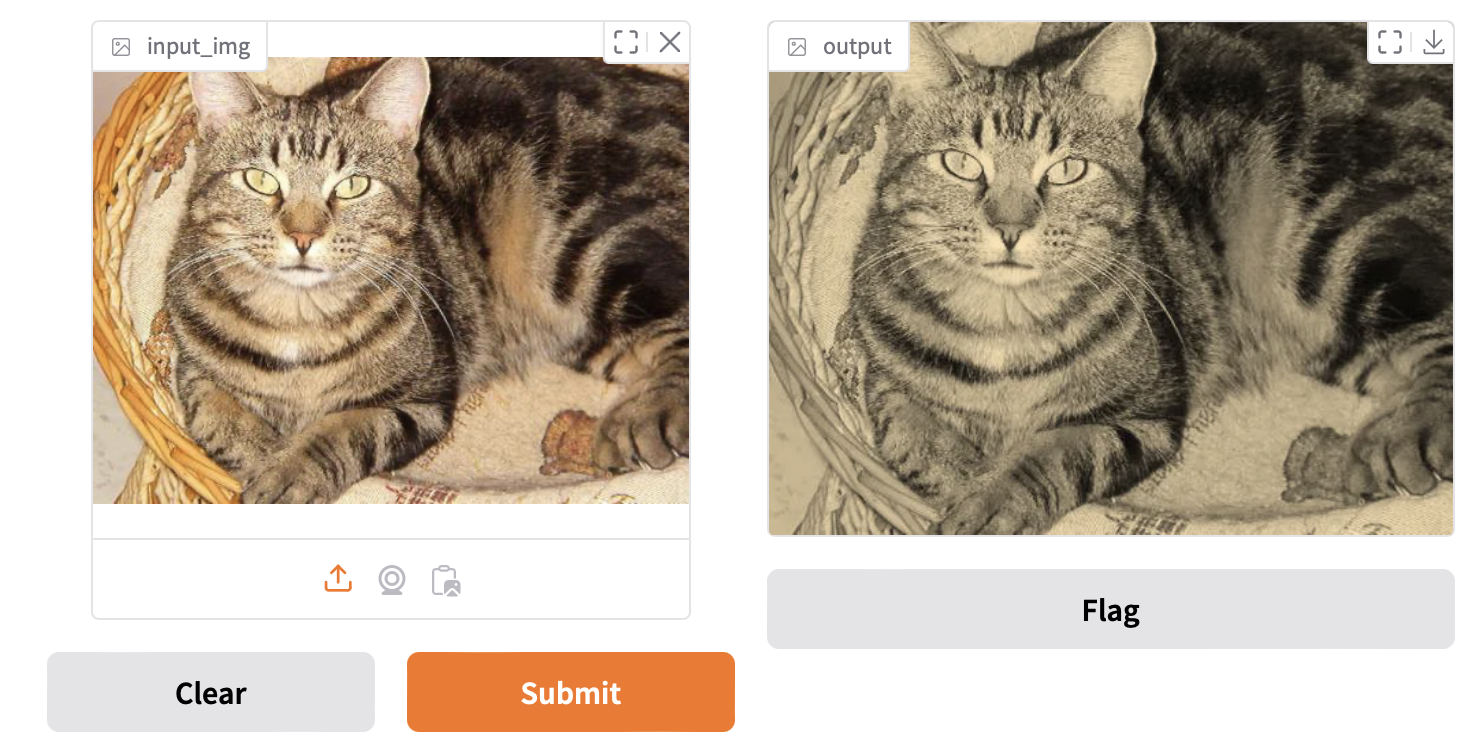
def sepia(input_img, request: gr.Request):
print("Request headers dictionary:", request.headers)
print("IP address:", request.client.host)
print(f"{type(input_img)=}")
sepia_filter = np.array([
[0.393, 0.769, 0.189],
[0.349, 0.686, 0.168],
[0.272, 0.534, 0.131]
])
sepia_img = input_img.dot(sepia_filter.T)
sepia_img /= sepia_img.max()
return sepia_img
demo = gr.Interface(
fn=sepia,
inputs=gr.Image(height=300, width=300),
outputs="image"
)
demo.launch(share=True)
Result:
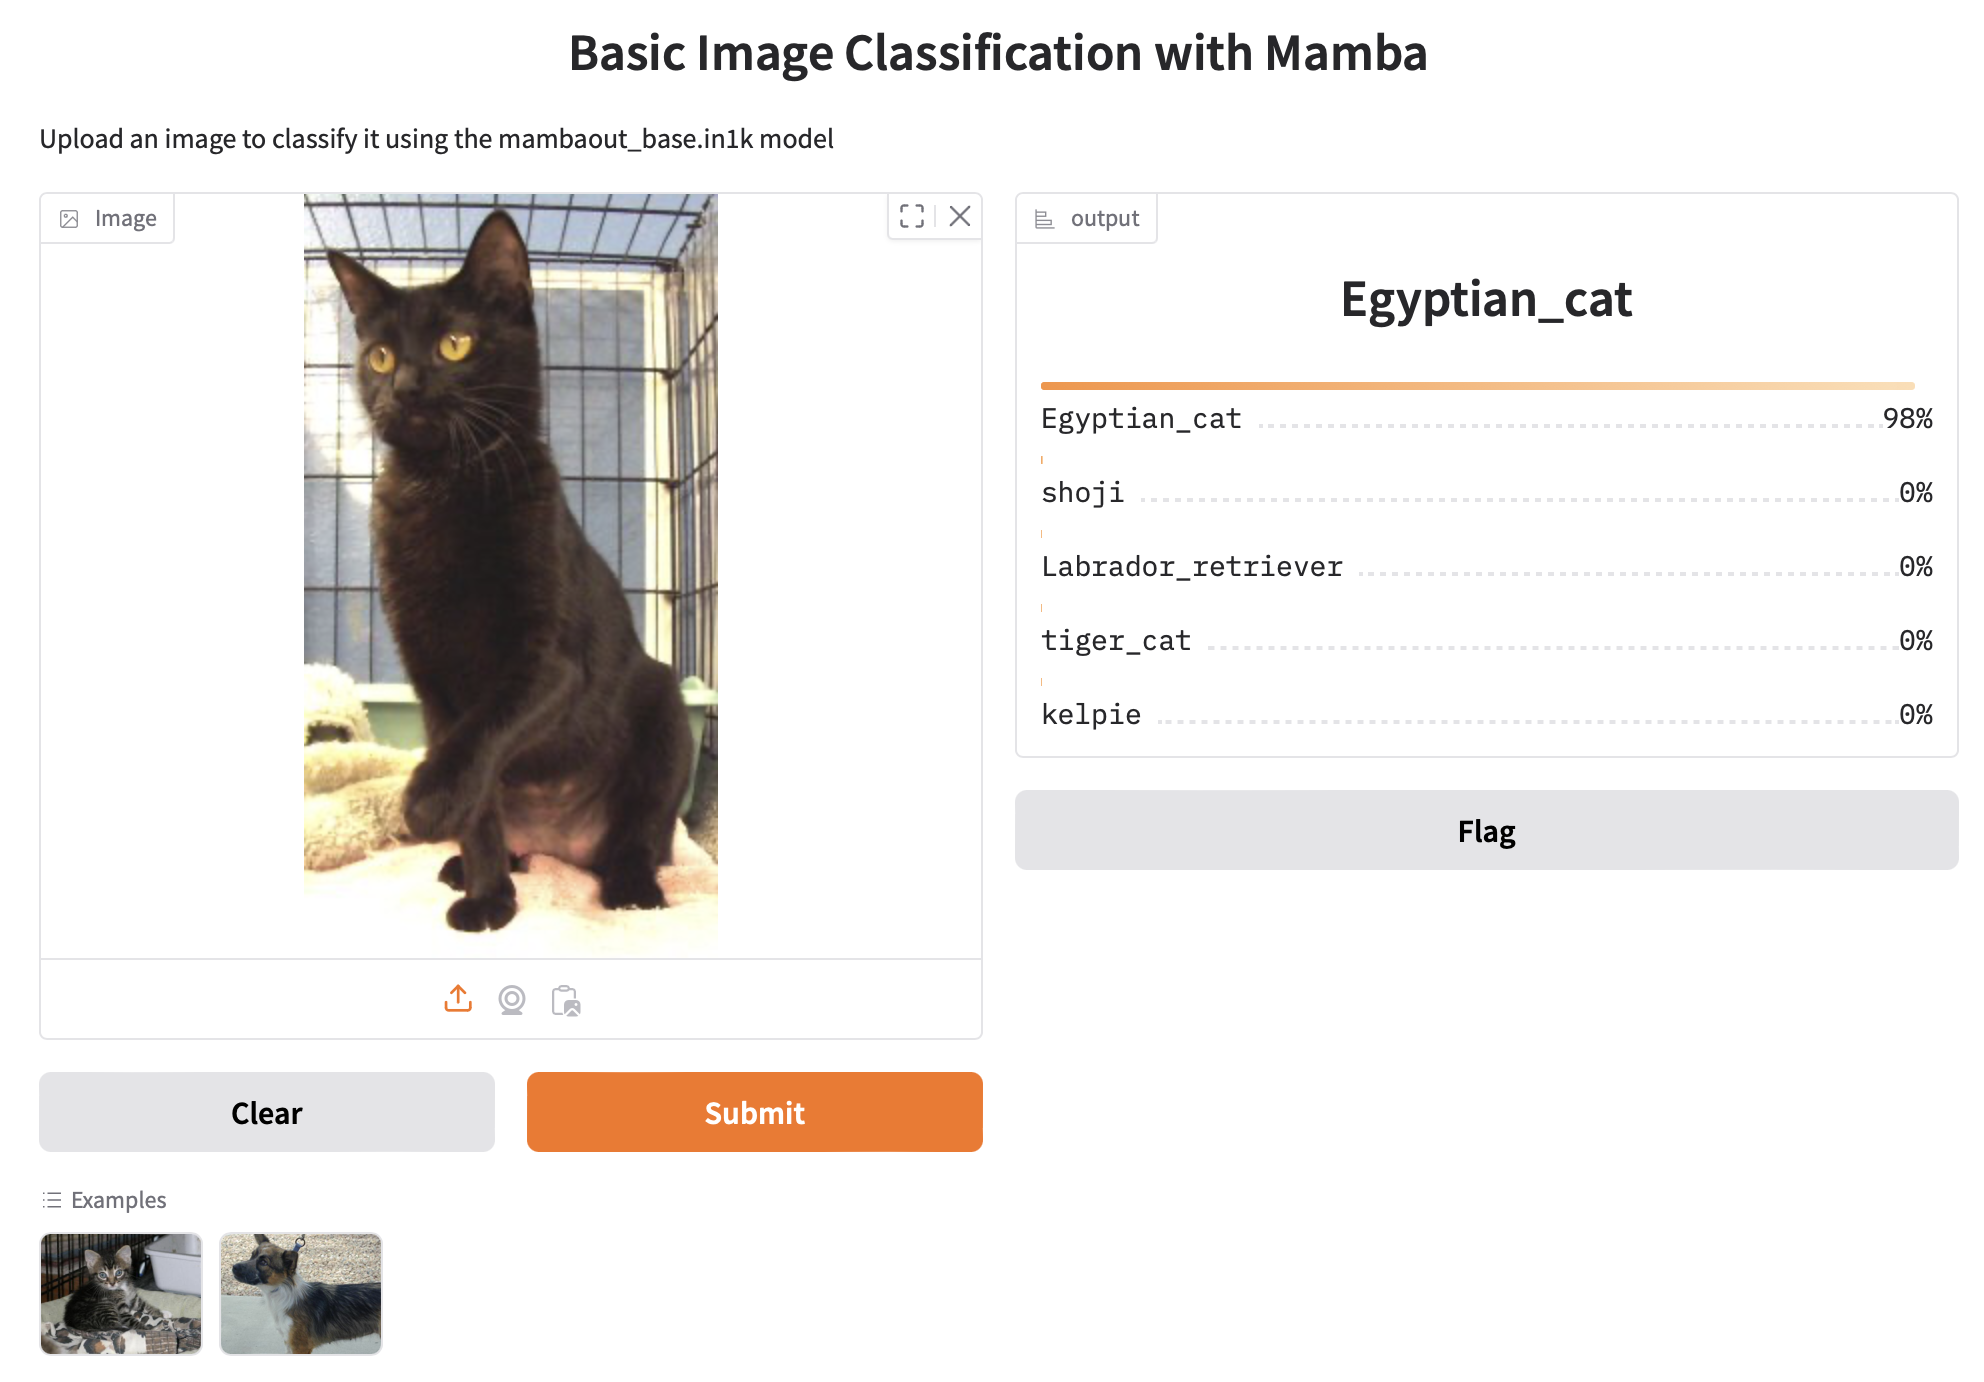
Example 5: Image Classification
Code:
import gradio as gr
import torch
import timm
from PIL import Image
import requests

class ImageClassifier:
    def __init__(self):
        self.device = torch.device('cuda' if torch.cuda.is_available() else 'cpu')
        # Create model and move to appropriate device
        self.model = timm.create_model('mambaout_base.in1k', pretrained=True)
        self.model = self.model.to(self.device)
        self.model.eval()

        # Get model-specific transforms
        data_config = timm.data.resolve_model_data_config(self.model)
        self.transform = timm.data.create_transform(**data_config, is_training=False)

        # Load ImageNet labels
        url = 'https://storage.googleapis.com/bit_models/ilsvrc2012_wordnet_lemmas.txt'
        self.labels = requests.get(url).text.strip().split('\n')

    @torch.no_grad()
    def predict(self, image):
        if image is None:
            return None

        # Preprocess image
        img = Image.fromarray(image).convert('RGB')
        img_tensor = self.transform(img).unsqueeze(0).to(self.device)

        # Get prediction
        output = self.model(img_tensor)
        probabilities = torch.nn.functional.softmax(output[0], dim=0)

        # Get top 5 predictions
        top5_prob, top5_catid = torch.topk(probabilities, 5)

        return {
            self.labels[idx.item()]: float(prob)
            for prob, idx in zip(top5_prob, top5_catid)
        }

# Create classifier instance
classifier = ImageClassifier()

# Create Gradio interface
demo = gr.Interface(
    fn=classifier.predict,
    inputs=gr.Image(),
    outputs=gr.Label(num_top_classes=5),
    title="Basic Image Classification with Mamba",
    description="Upload an image to classify it using the mambaout_base.in1k model",
    examples=[
        ["examples/cat.jpg"],
        ["examples/dog.jpg"]
    ]
)

if __name__ == "__main__":
    demo.launch()
Result:
- Input: Upload an image (e.g., a cat or dog photo).
- Output: The model predicts the top 5 labels with their respective probabilities based on ImageNet classes.
Output displays the top 5 predictions with probabilities as shown in below example:
Example 6: Batch Image Classification
This example demonstrates how to perform batch image classification using the mambaout_base.in1k model. It supports multiple concurrent image preprocessing, inference, and result generation.
Server
import gradio as gr
import torch
import timm
from PIL import Image
import numpy as np

class ImageClassifier:
    def __init__(self):
        self.device = torch.device('cuda' if torch.cuda.is_available() else 'cpu')
        self.model = timm.create_model('mambaout_base.in1k', pretrained=True)
        self.model = self.model.to(self.device)
        self.model.eval()

        # Set up data transforms and labels
        data_config = timm.data.resolve_model_data_config(self.model)
        self.transform = timm.data.create_transform(**data_config, is_training=False)

        import requests
        url = 'https://storage.googleapis.com/bit_models/ilsvrc2012_wordnet_lemmas.txt'
        self.labels = requests.get(url).text.strip().split('\n')

    @torch.no_grad()
    def predict_batch(self, image_list, progress=gr.Progress(track_tqdm=True)):
        if isinstance(image_list, tuple) and len(image_list) == 1:
            image_list = [image_list[0]]

        if not image_list or image_list[0] is None:
            return [[{"none": 1.0}]]

        progress(0.1, desc="Starting preprocessing...")
        tensors = []

        # Process each image in the batch
        for image in image_list:
            if image is None:
                continue
            img = Image.fromarray(image).convert('RGB')
            tensor = self.transform(img)
            tensors.append(tensor)

        if not tensors:
            return [[{"none": 1.0}]]

        progress(0.4, desc="Batching tensors...")
        batch = torch.stack(tensors).to(self.device)

        progress(0.6, desc="Running inference...")
        outputs = self.model(batch)
        probabilities = torch.nn.functional.softmax(outputs, dim=1)

        progress(0.8, desc="Processing results...")
        batch_results = []
        for probs in probabilities:
            top5_prob, top5_catid = torch.topk(probs, 5)
            result = {
                self.labels[idx.item()]: float(prob)
                for prob, idx in zip(top5_prob, top5_catid)
            }
            batch_results.append(result)

        progress(1.0, desc="Done!")
        return [batch_results]

# Create classifier instance
classifier = ImageClassifier()

# Create Gradio interface
demo = gr.Interface(
    fn=classifier.predict_batch,
    inputs=gr.Image(),
    outputs=gr.Label(num_top_classes=5),
    title="Advanced Image Classification with Mamba",
    description="Upload images for batch classification with the mambaout_base.in1k model",
    batch=True,
    max_batch_size=4
)

if __name__ == "__main__":
    demo.launch()
Client
from gradio_client import Client, handle_file
import concurrent.futures
import time

def make_prediction(client, image_url):
    """Make a single prediction"""
    try:
        result = client.predict(
            image_list=handle_file(image_url),
            api_name="/predict"
        )
        return result
    except Exception as e:
        return f"Error: {str(e)}"

def main():
    # Test image URL
    image_url = "https://raw.githubusercontent.com/gradio-app/gradio/main/test/test_files/bus.png"

    # Initialize client
    client = Client("http://127.0.0.1:7860/")

    print("\nSending 16 concurrent requests with the same image...")
    start_time = time.time()

    # Send concurrent requests
    with concurrent.futures.ThreadPoolExecutor(max_workers=16) as executor:
        futures = [
            executor.submit(make_prediction, client, image_url)
            for _ in range(16)
        ]

        results = []
        for i, future in enumerate(concurrent.futures.as_completed(futures)):
            try:
                result = future.result()
                results.append(result)
                print(f"Completed prediction {i+1}/16")
            except Exception as e:
                print(f"Error in request {i+1}: {str(e)}")

    end_time = time.time()

    # Print results
    print(f"\nAll predictions completed in {end_time - start_time:.2f} seconds")
    print("\nResults:")
    for i, result in enumerate(results):
        print(f"\nRequest {i+1}:")
        print(result)

if __name__ == "__main__":
    main()
Result:
Each image returns the top 5 predicted labels with probabilities from the ImageNet dataset.
Example Workflow
- Server Side:
- Launch the Gradio app.
- Upload a batch of images (e.g., buses, cats, dogs, etc.).
- View top-5 predictions for each image along with progress updates.
- Client Side:
- Sends multiple concurrent requests to the Gradio server using
gradio_client. - Receives predictions and logs them to the console.
- Sends multiple concurrent requests to the Gradio server using
Example Prediction (Server Output):
For a bus image:
{
   "label":"minibus",
   "confidences":[
      {
         "label":"minibus",
         "confidence":0.571755051612854
      },
      {
         "label":"vacuum, vacuum_cleaner",
         "confidence":0.07250463962554932
      },
      {
         "label":"passenger_car, coach, carriage",
         "confidence":0.05805877596139908
      },
      {
         "label":"trolleybus, trolley_coach, trackless_trolley",
         "confidence":0.03005979023873806
      },
      {
         "label":"school_bus",
         "confidence":0.005981458351016045
      }
   ]
}
Example 7: Deploying Apple’s Depth Pro Model using Gradio
This example demonstrates deploying Depth Pro model for monocular metric depth estimation. The model processes an input image to generate a depth map and estimate focal length in pixels.
To run the Depth Pro model, you need to first set up the required dependencies and download the pre-trained weights.
download_weights.sh
Run below script as it creates a directory named checkpoints and downloads the pre-trained weights for the Depth Pro model.
#!/bin/bash
mkdir -p checkpoints
wget https://ml-site.cdn-apple.com/models/depth-pro/depth_pro.pt -P checkpoints
requirements.txt
Install the dependencies with the following command:
pip install git+https://github.com/apple/ml-depth-pro.git
Once the weights and dependencies are set up, we’re ready to deploy and run the Depth Pro application.
Server
import depth_pro
import gradio as gr
import matplotlib.cm as cm
import numpy as np
from depth_pro.depth_pro import DepthProConfig
from PIL import Image
import torch

# CSS for better styling - simplified
CUSTOM_CSS = """
.output-panel {
    padding: 15px;
    border-radius: 8px;
    background-color: #f8f9fa;
}
"""

DESCRIPTION = """
# Depth Pro: Sharp Monocular Metric Depth Estimation

This demo uses Apple's Depth Pro model to estimate depth from a single image. The model can:
- Generate high-quality depth maps
- Estimate focal length
- Process images in less than a second

## Instructions
1. Upload an image or use one of the example images
2. Click "Generate Depth Map" to process
3. View the depth map and estimated focal length
"""

class DepthEstimator:
    def __init__(self):
        self.device = torch.device('cuda' if torch.cuda.is_available() else 'cpu')
        self.config = DepthProConfig(
            patch_encoder_preset="dinov2l16_384",
            image_encoder_preset="dinov2l16_384",
            checkpoint_uri="./checkpoints/depth_pro.pt",
            decoder_features=256,
            use_fov_head=True,
            fov_encoder_preset="dinov2l16_384",
        )
        self.model, self.transform = depth_pro.create_model_and_transforms(config=self.config)
        self.model.eval()
        self.model.to(self.device)

    def process_image(self, input_image_path, progress=gr.Progress()):
        if input_image_path is None:
            return None, None

        progress(0.2, "Loading image...")
        image, _, f_px = depth_pro.load_rgb(input_image_path)

        progress(0.4, "Preprocessing...")
        image = self.transform(image)
        image = image.to(self.device)

        progress(0.6, "Generating depth map...")
        with torch.no_grad():
            prediction = self.model.infer(image, f_px=f_px)

        progress(0.8, "Post-processing...")
        depth_map = prediction["depth"].squeeze().cpu().numpy()
        focallength_px = prediction["focallength_px"]

        # Normalize and colorize depth map
        depth_map = (depth_map - depth_map.min()) / (depth_map.max() - depth_map.min())
        colormap = cm.get_cmap("magma")
        depth_map = colormap(depth_map)
        depth_map = (depth_map[:, :, :3] * 255).astype(np.uint8)
        depth_map = Image.fromarray(depth_map)

        progress(1.0, "Done!")
        return depth_map, float(focallength_px.item())

def create_demo():
    estimator = DepthEstimator()

    with gr.Blocks(css=CUSTOM_CSS) as demo:
        gr.Markdown(DESCRIPTION)

        with gr.Row():
            with gr.Column(scale=1):
                input_image = gr.Image(
                    label="Input Image",
                    type="filepath",
                    sources=["upload", "webcam"]
                )

                with gr.Row():
                    clear_btn = gr.Button("Clear", variant="secondary")
                    submit_btn = gr.Button("Generate Depth Map", variant="primary")

            with gr.Column(scale=1, elem_classes=["output-panel"]):
                output_depth_map = gr.Image(
                    label="Depth Map",
                    show_label=True
                )
                output_focal_length = gr.Number(
                    label="Estimated Focal Length (pixels)",
                    precision=2
                )

        # Event handlers
        submit_btn.click(
            fn=estimator.process_image,
            inputs=[input_image],
            outputs=[output_depth_map, output_focal_length]
        )

        clear_btn.click(
            fn=lambda: (None, None, None),
            inputs=[],
            outputs=[input_image, output_depth_map, output_focal_length]
        )

    return demo

if __name__ == "__main__":
    demo = create_demo()
    demo.launch(
        share=True,
        show_error=True
    )
Result:
Example Prediction 1
For an input image:
-
Depth Map:
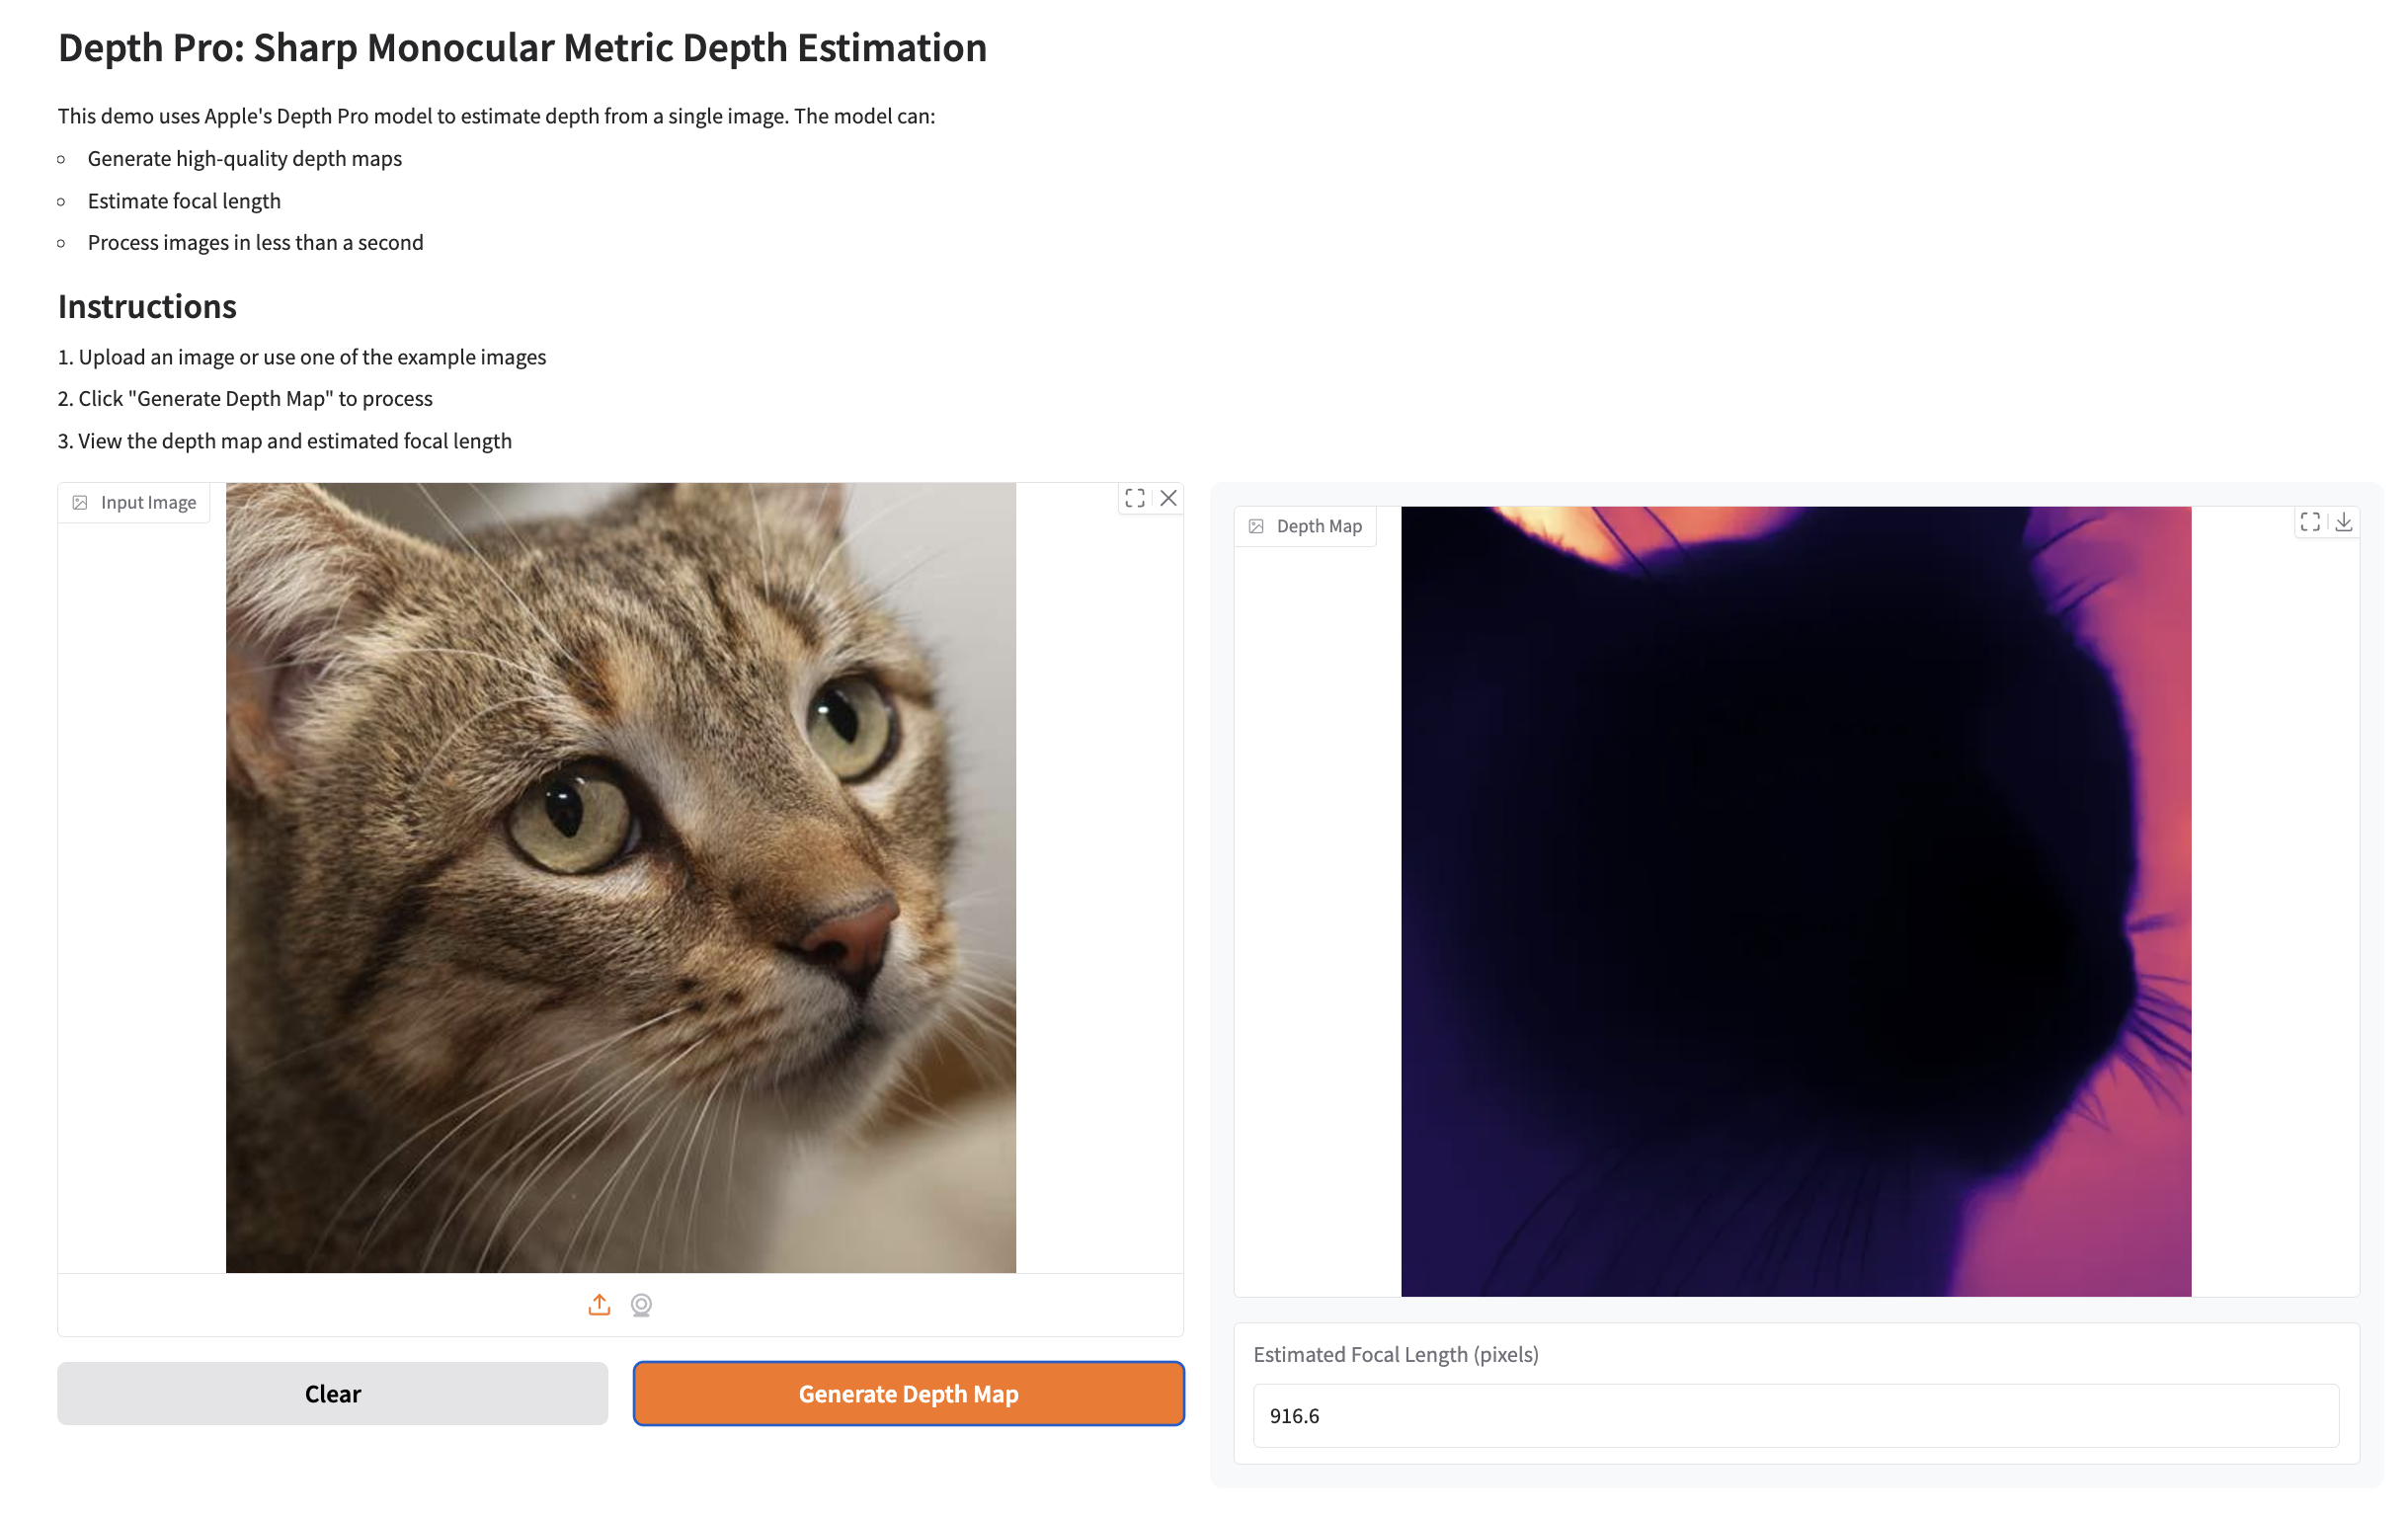
-
Focal Length:
Estimated Focal Length: 916.6 pixels
Example Prediction 2
For an input image:
-
Depth Map:
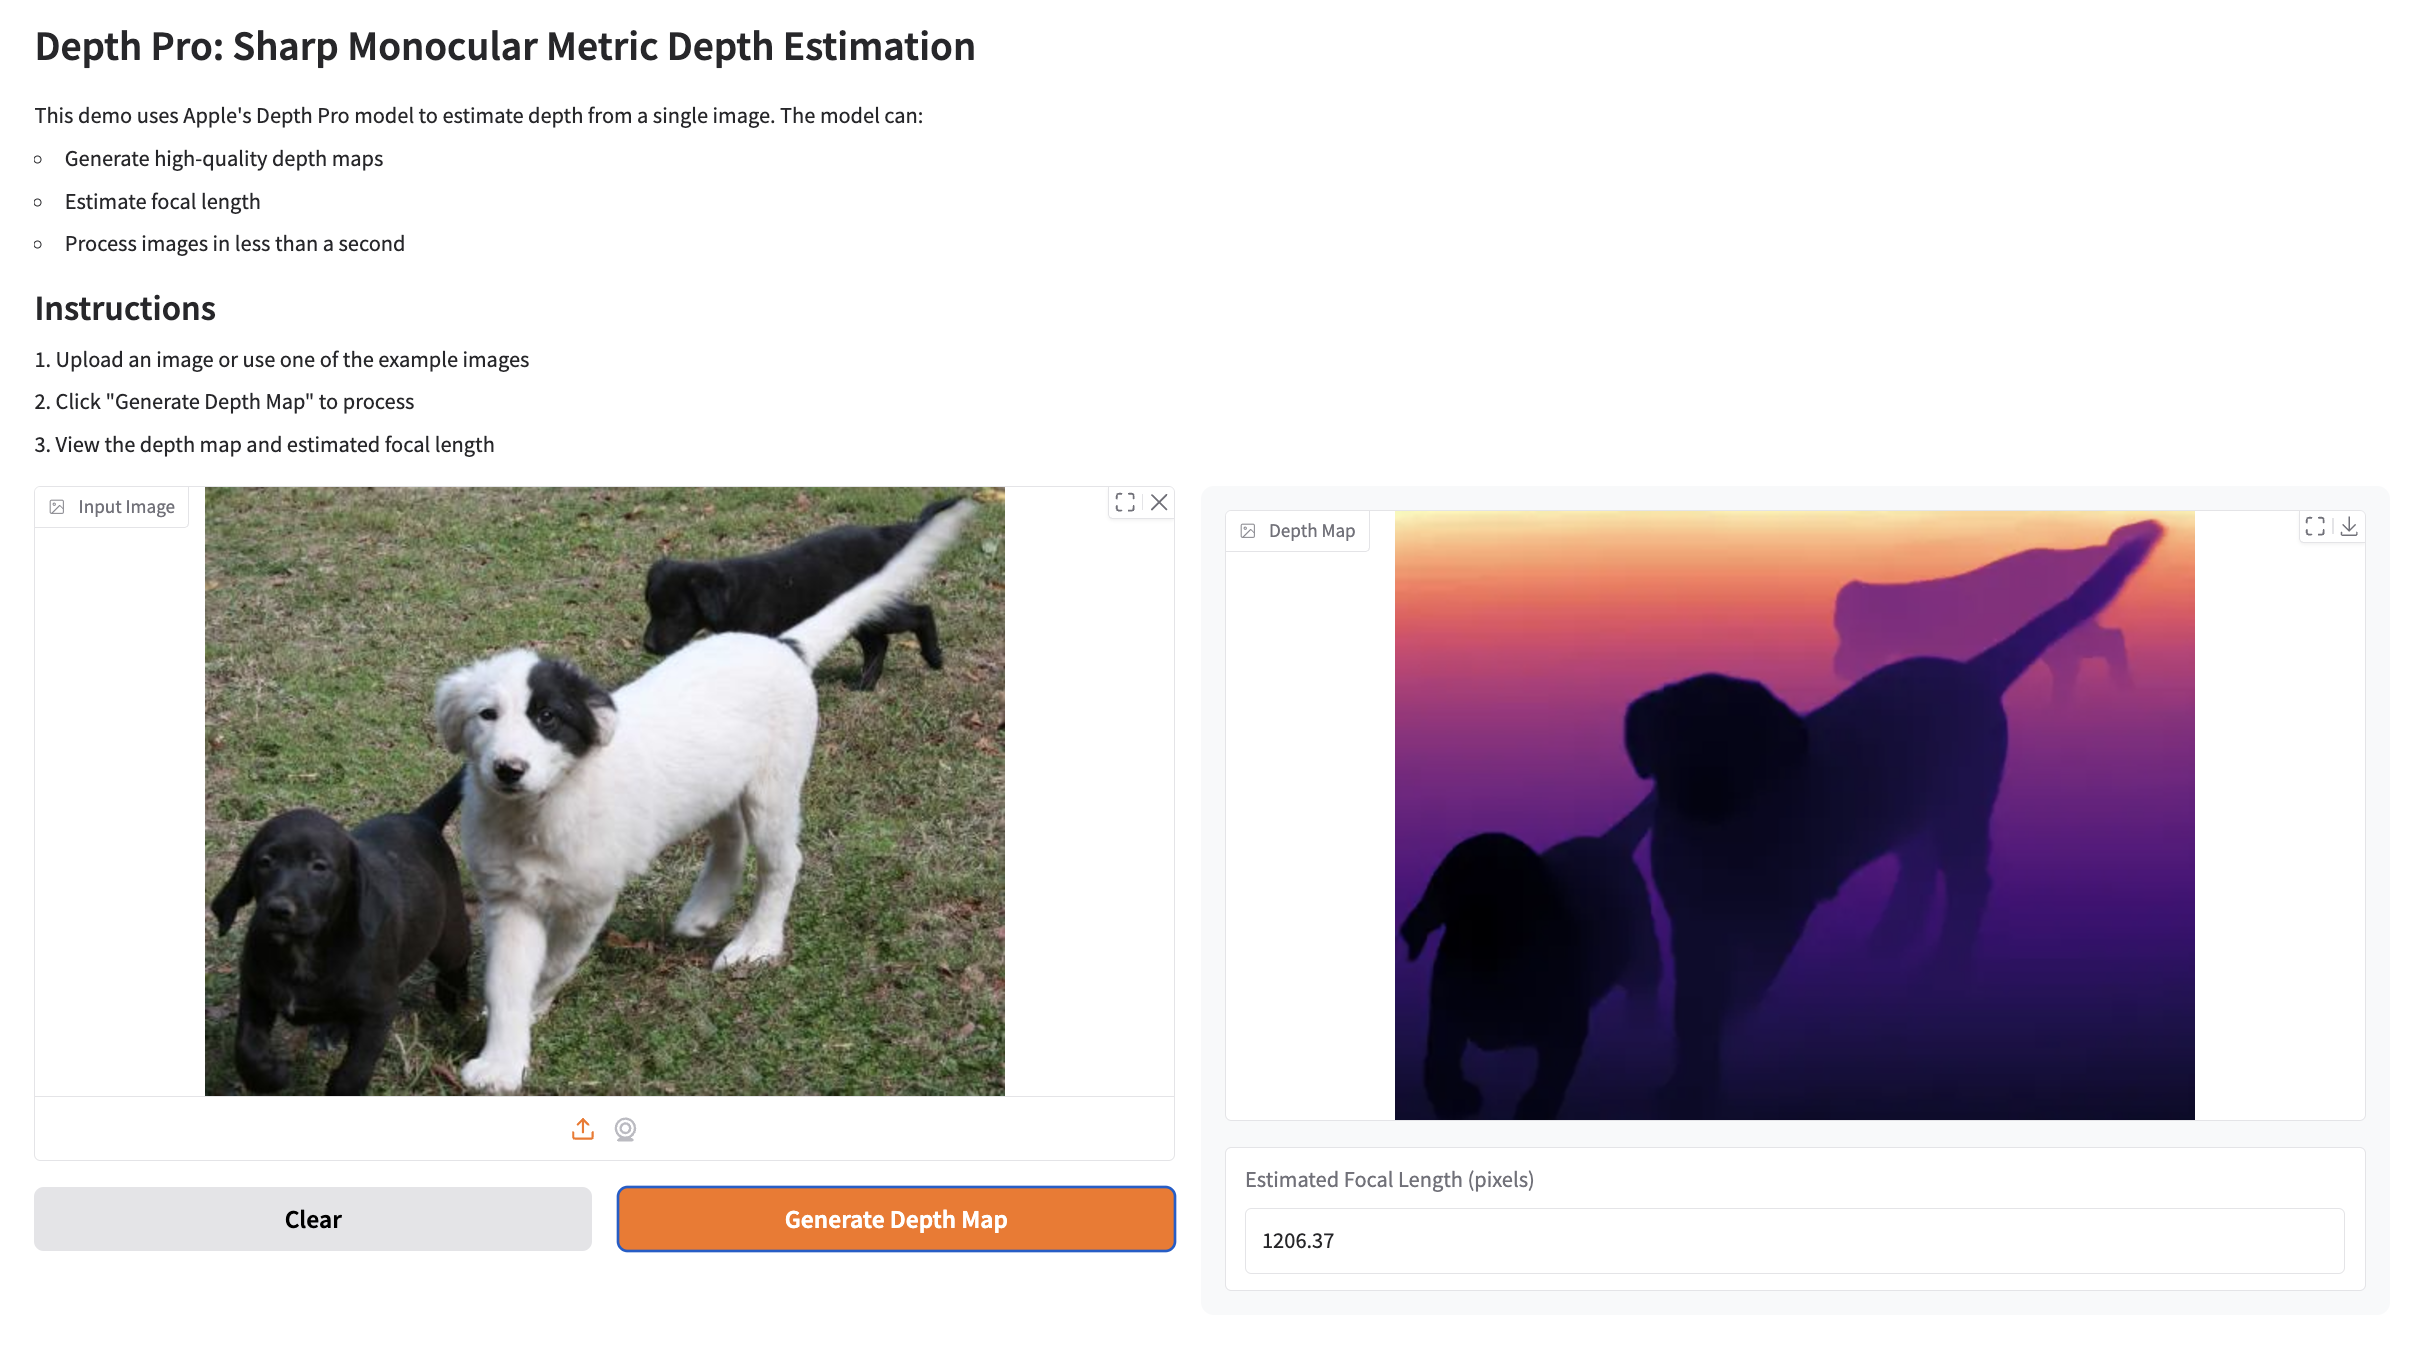
-
Focal Length:
Estimated Focal Length: 1206.37 pixels
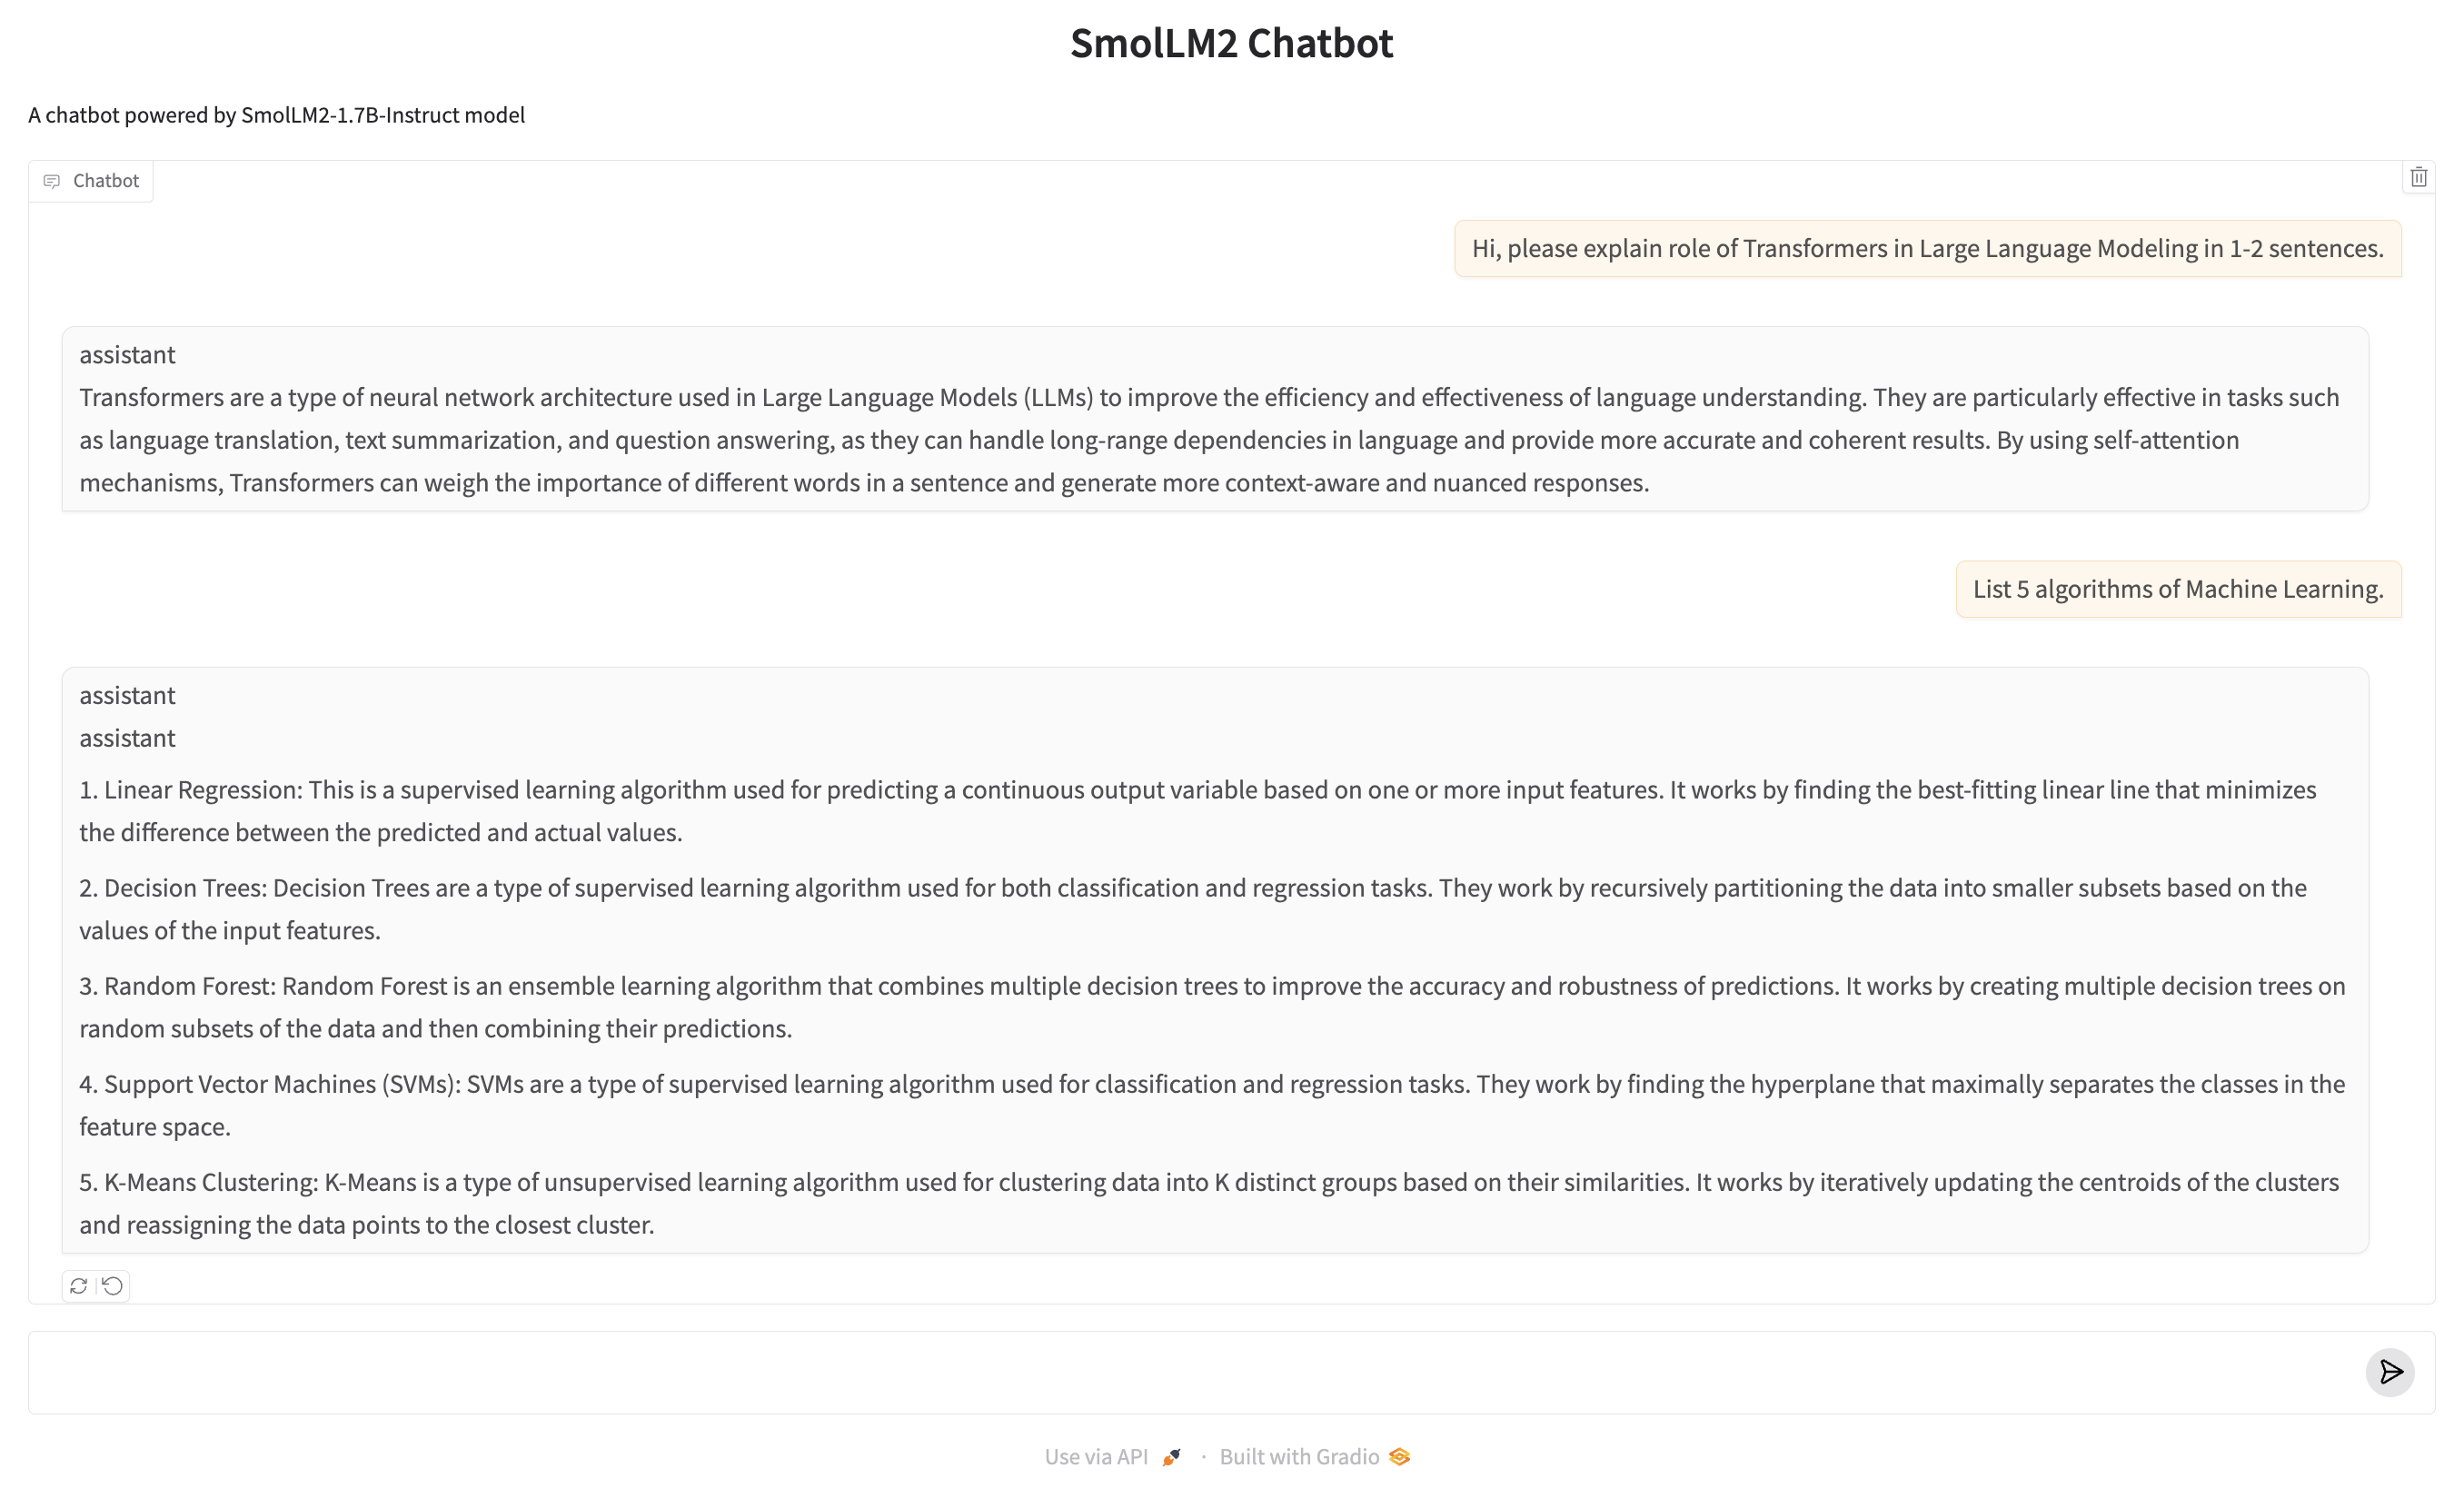
Example 8: Deploying a Chatbot
Below is an example of deploying a chatbot using Gradio and the SmolLM2-1.7B-Instruct model from Hugging Face.
Key Steps
- Model Loading:
- The AutoTokenizer and AutoModelForCausalLM are used to load the tokenizer and the SmolLM2 model, optimized for CUDA.
- Chat Response Function:
- Handles incoming user messages and chat history.
- Converts the messages into a format the model understands and streams the generated responses.
- Streaming:
- The chatbot streams responses token by token for a real-time conversational feel.
chatbot.py
import gradio as gr
from transformers import AutoModelForCausalLM, AutoTokenizer, TextIteratorStreamer
import torch
from threading import Thread

# Load model and tokenizer
checkpoint = "HuggingFaceTB/SmolLM2-1.7B-Instruct"
device = "cuda"
tokenizer = AutoTokenizer.from_pretrained(checkpoint)
model = AutoModelForCausalLM.from_pretrained(checkpoint, device_map="auto")

def chat_response(message, history):
    print(f"Received message: {message}")
    print(f"History: {history}")

    messages = []
    for h in history:
        messages.append(h)  # Each h is already a dict with 'role' and 'content'
    messages.append({"role": "user", "content": message})

    # Generate response
    input_text = tokenizer.apply_chat_template(messages, tokenize=False)
    inputs = tokenizer.encode(input_text, return_tensors="pt").to(device)

    # Setup streamer
    streamer = TextIteratorStreamer(tokenizer, timeout=10., skip_prompt=True, skip_special_tokens=True)

    # Generate with streaming
    generation_kwargs = dict(
        inputs=inputs,
        max_new_tokens=256,
        temperature=0.2,
        top_p=0.9,
        do_sample=True,
        pad_token_id=tokenizer.eos_token_id,
        streamer=streamer
    )

    # Create a thread to run the generation
    thread = Thread(target=model.generate, kwargs=generation_kwargs)
    thread.start()

    # Stream the response
    partial_message = ""
    for new_token in streamer:
        partial_message += new_token
        yield partial_message

# Create and launch the Gradio interface
demo = gr.ChatInterface(
    fn=chat_response,
    type="messages",
    title="SmolLM2 Chatbot",
    description="A chatbot powered by SmolLM2-1.7B-Instruct model",
    examples=[
        "What is the capital of France?",
        "How does photosynthesis work?",
        "Write a short poem about autumn."
    ],
    cache_examples=True
)

if __name__ == "__main__":
    demo.launch()
Result:
TorchScript: A PyTorch Serialization Framework
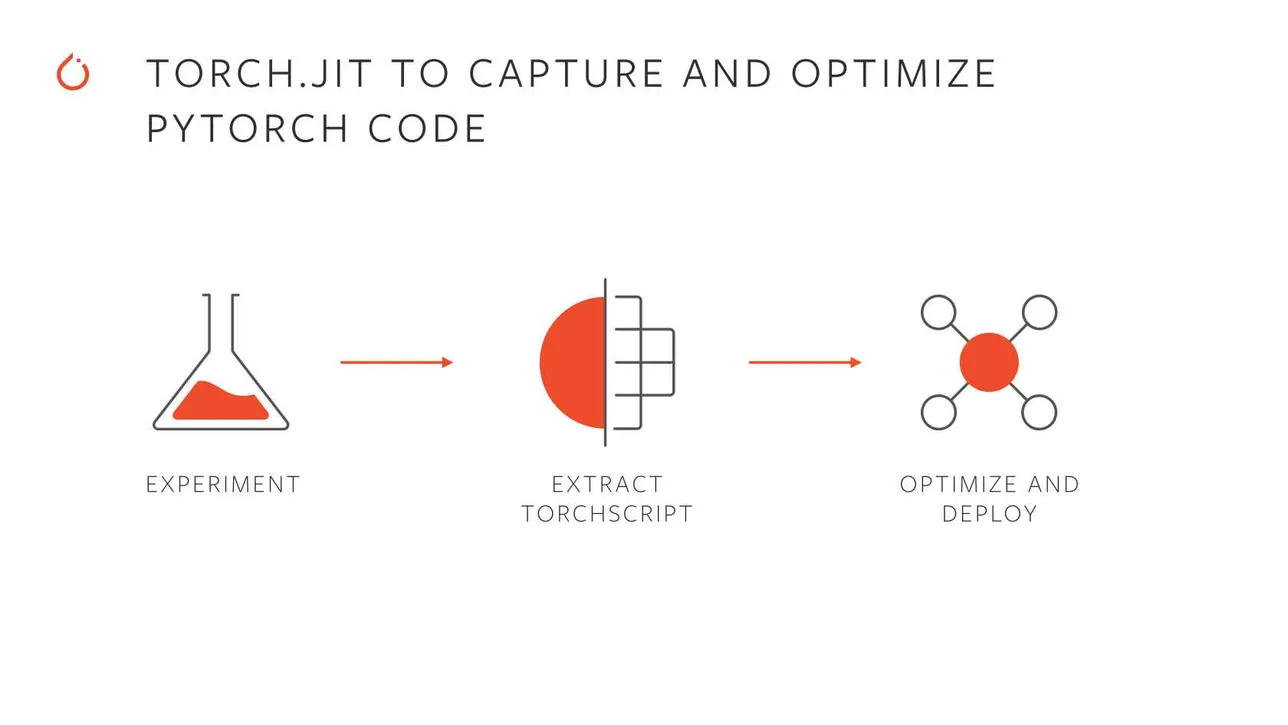
Credit: Facebook AI Research
TorchScript is a feature of PyTorch that enables you to serialize and optimize models for deployment. It transforms PyTorch models into a statically-typed intermediate representation that can be saved and executed in environments without Python, such as C++-based production systems.
Why Use TorchScript?
- Portability:
- TorchScript models can run in environments where Python is unavailable, making it ideal for deployment in production settings.
- Performance Optimization:
- Models can be optimized for faster inference by utilizing JIT (Just-In-Time) compilation and other optimizations.
- Cross-Platform Deployment:
- TorchScript supports running on diverse platforms, such as mobile devices, servers, and embedded systems.
- Debugging and Profiling:
- Offers better insights into model performance through tools like TorchServe and TensorBoard.
How TorchScript Works?
TorchScript creates a statically-typed subset of Python using two methods:
- Scripting:
- Converts Python code into TorchScript by directly annotating it with @torch.jit.script.
- Tracing:
- Records the operations performed on tensors while running the model and generates a TorchScript graph.
Key Features
-
TorchScript models can be saved using torch.jit.save and later loaded with torch.jit.load.
-
TorchScript models run independently of Python, ideal for environments like C++ or mobile runtimes.
-
TorchScript enforces type-checking, making the models more robust and predictable during runtime.
Example: Annotating and Inspecting a Scripted Function
Below is an example that demonstrates using TorchScript to script a function, inspect its computation graph, and execute it.
import torch

# Define a simple function to manipulate tensors
def add(x: torch.Tensor):
    # Increment the tensor in-place by 2.0
    x += 2.0

    # Create a tensor of ones with the same shape as x
    y = torch.ones_like(x)

    # Add y to x and store the result in x
    x = x + y

    # Return the sum of all elements in x
    return torch.sum(x)

# Convert the function into TorchScript using scripting
scripted = torch.jit.script(add)

# Print the TorchScript computation graph
print("Computation Graph of the Scripted Function:")
print(scripted.graph)

# Test the scripted function with a random input tensor
input_tensor = torch.randn(1, 2)
print("\nInput Tensor:")
print(input_tensor)

output = scripted(input_tensor)
print("\nOutput of the Scripted Function:")
print(output)
Result
Computation Graph of the Scripted Function:
graph(%x.1 : Tensor):
  %6 : NoneType = prim::Constant()
  %3 : int = prim::Constant[value=1]()
  %2 : float = prim::Constant[value=2.]()
  %x.5 : Tensor = aten::add_(%x.1, %2, %3)
  %y.1 : Tensor = aten::ones_like(%x.5, %6, %6, %6, %6, %6)
  %x.11 : Tensor = aten::add(%x.5, %y.1, %3)
  %18 : Tensor = aten::sum(%x.11, %6)
  return (%18)


Input Tensor:
tensor([[0.1471, 0.4504]])

Output of the Scripted Function:
tensor(6.5975)
TorchScript: Script vs Tracing
TorchScript offers two primary methods to export PyTorch models for optimization and deployment: Tracing and Scripting. Each method has specific use cases and characteristics, which are outlined below:
1. Tracing
Tracing records the operations executed by the model when it is run with specific input data. The resulting computation graph represents only the operations that were used during the trace.
Key Characteristics:
- Export API: torch.jit.trace(model, input)
- How it works:
- Runs the model with dummy inputs.
- Records the executed tensor operations to build a computation graph.
2. Scripting
Scripting directly compiles the Python source code of a model into a computation graph. It captures both tensor operations and full Python control flow, resulting in a more flexible and accurate representation of the model.
Key Characteristics:
- Export API: torch.jit.script(model)
- How it works:
- Parses the model’s Python code to create a graph representation of both operations and control logic.
- Includes all conditional statements (if, for, etc.) as part of the graph.
Comparison: Script vs. Trace
| Feature | Tracing | Scripting |
|---|---|---|
| API | torch.jit.trace(model, input) | torch.jit.script(model) |
| Handles Conditional Logic | ❌ Ignored; only follows the traced path | ✅ Captures all control flow |
| Input Dependency | Input-dependent; limited to traced path | Input-independent; models full logic |
| Use Cases | Static graphs (e.g., CNNs) | Dynamic models (e.g., RNNs, LSTMs) |
| Ease of Use | Simple; just provide input examples | Requires annotating dynamic logic |
Deployment of Deep Learning Classifier with Gradio
Below are the steps and code snippets for deploying a Classification model using TorchScript and Gradio:
1. Trace and Save the Model
The src/script.py script demonstrates how to trace a PyTorch model and save it as a TorchScript model.
import os
from pathlib import Path
import logging
import hydra
from omegaconf import DictConfig
import torch
import rootutils

root = rootutils.setup_root(__file__, indicator=".project-root", pythonpath=True)
log = logging.getLogger(__name__)

@hydra.main(version_base="1.3", config_path="../configs", config_name="train")
def main(cfg: DictConfig) -> None:
    log.info(f"Instantiating model <{cfg.model._target_}>")
    model = hydra.utils.instantiate(cfg.model)

    if cfg.get("ckpt_path"):
        log.info(f"Loading checkpoint: {cfg.ckpt_path}")
        checkpoint = torch.load(cfg.ckpt_path)
        model.load_state_dict(checkpoint['state_dict'])

    model.eval()
    example_input = torch.randn(1, 3, 160, 160)

    log.info("Tracing model...")
    traced_model = model.to_torchscript(method="trace", example_inputs=example_input)

    output_dir = Path("traced_models")
    output_dir.mkdir(exist_ok=True)
    output_path = output_dir / "model.pt"
    torch.jit.save(traced_model, output_path)
    log.info(f"Traced model saved to: {output_path}")

if __name__ == "__main__":
    main()
Run the script to generate the TorchScript model:
python src/script.py experiment=<experiment_name>
ckpt_path=</path/to/checkpoint/>
2. Install Dependencies
Requirements:
torch
gradio
torchvision
pip install -r requirements.txt
3. Gradio Interface
The app.py script sets up a Gradio-based web interface for the classifier.
import gradio as gr
import torch
import torchvision.transforms as transforms
from PIL import Image
class CatDogClassifier:
def __init__(self, model_path="model.pt"):
self.device = torch.device('cuda' if torch.cuda.is_available() else 'cpu')
self.model = torch.jit.load(model_path).to(self.device)
self.model.eval()
self.transform = transforms.Compose([
transforms.Resize((160, 160)),
transforms.ToTensor(),
transforms.Normalize(
mean=[0.485, 0.456, 0.406],
std=[0.229, 0.224, 0.225]
)
])
self.labels = ['Dog', 'Cat']
@torch.no_grad()
def predict(self, image):
if image is None:
return None
if not isinstance(image, Image.Image):
image = Image.fromarray(image).convert('RGB')
img_tensor = self.transform(image).unsqueeze(0).to(self.device)
output = self.model(img_tensor)
probabilities = torch.nn.functional.softmax(output[0], dim=0)
return {
self.labels[idx]: float(prob)
for idx, prob in enumerate(probabilities)
}
classifier = CatDogClassifier()
demo = gr.Interface(
fn=classifier.predict,
inputs=gr.Image(),
outputs=gr.Label(num_top_classes=2),
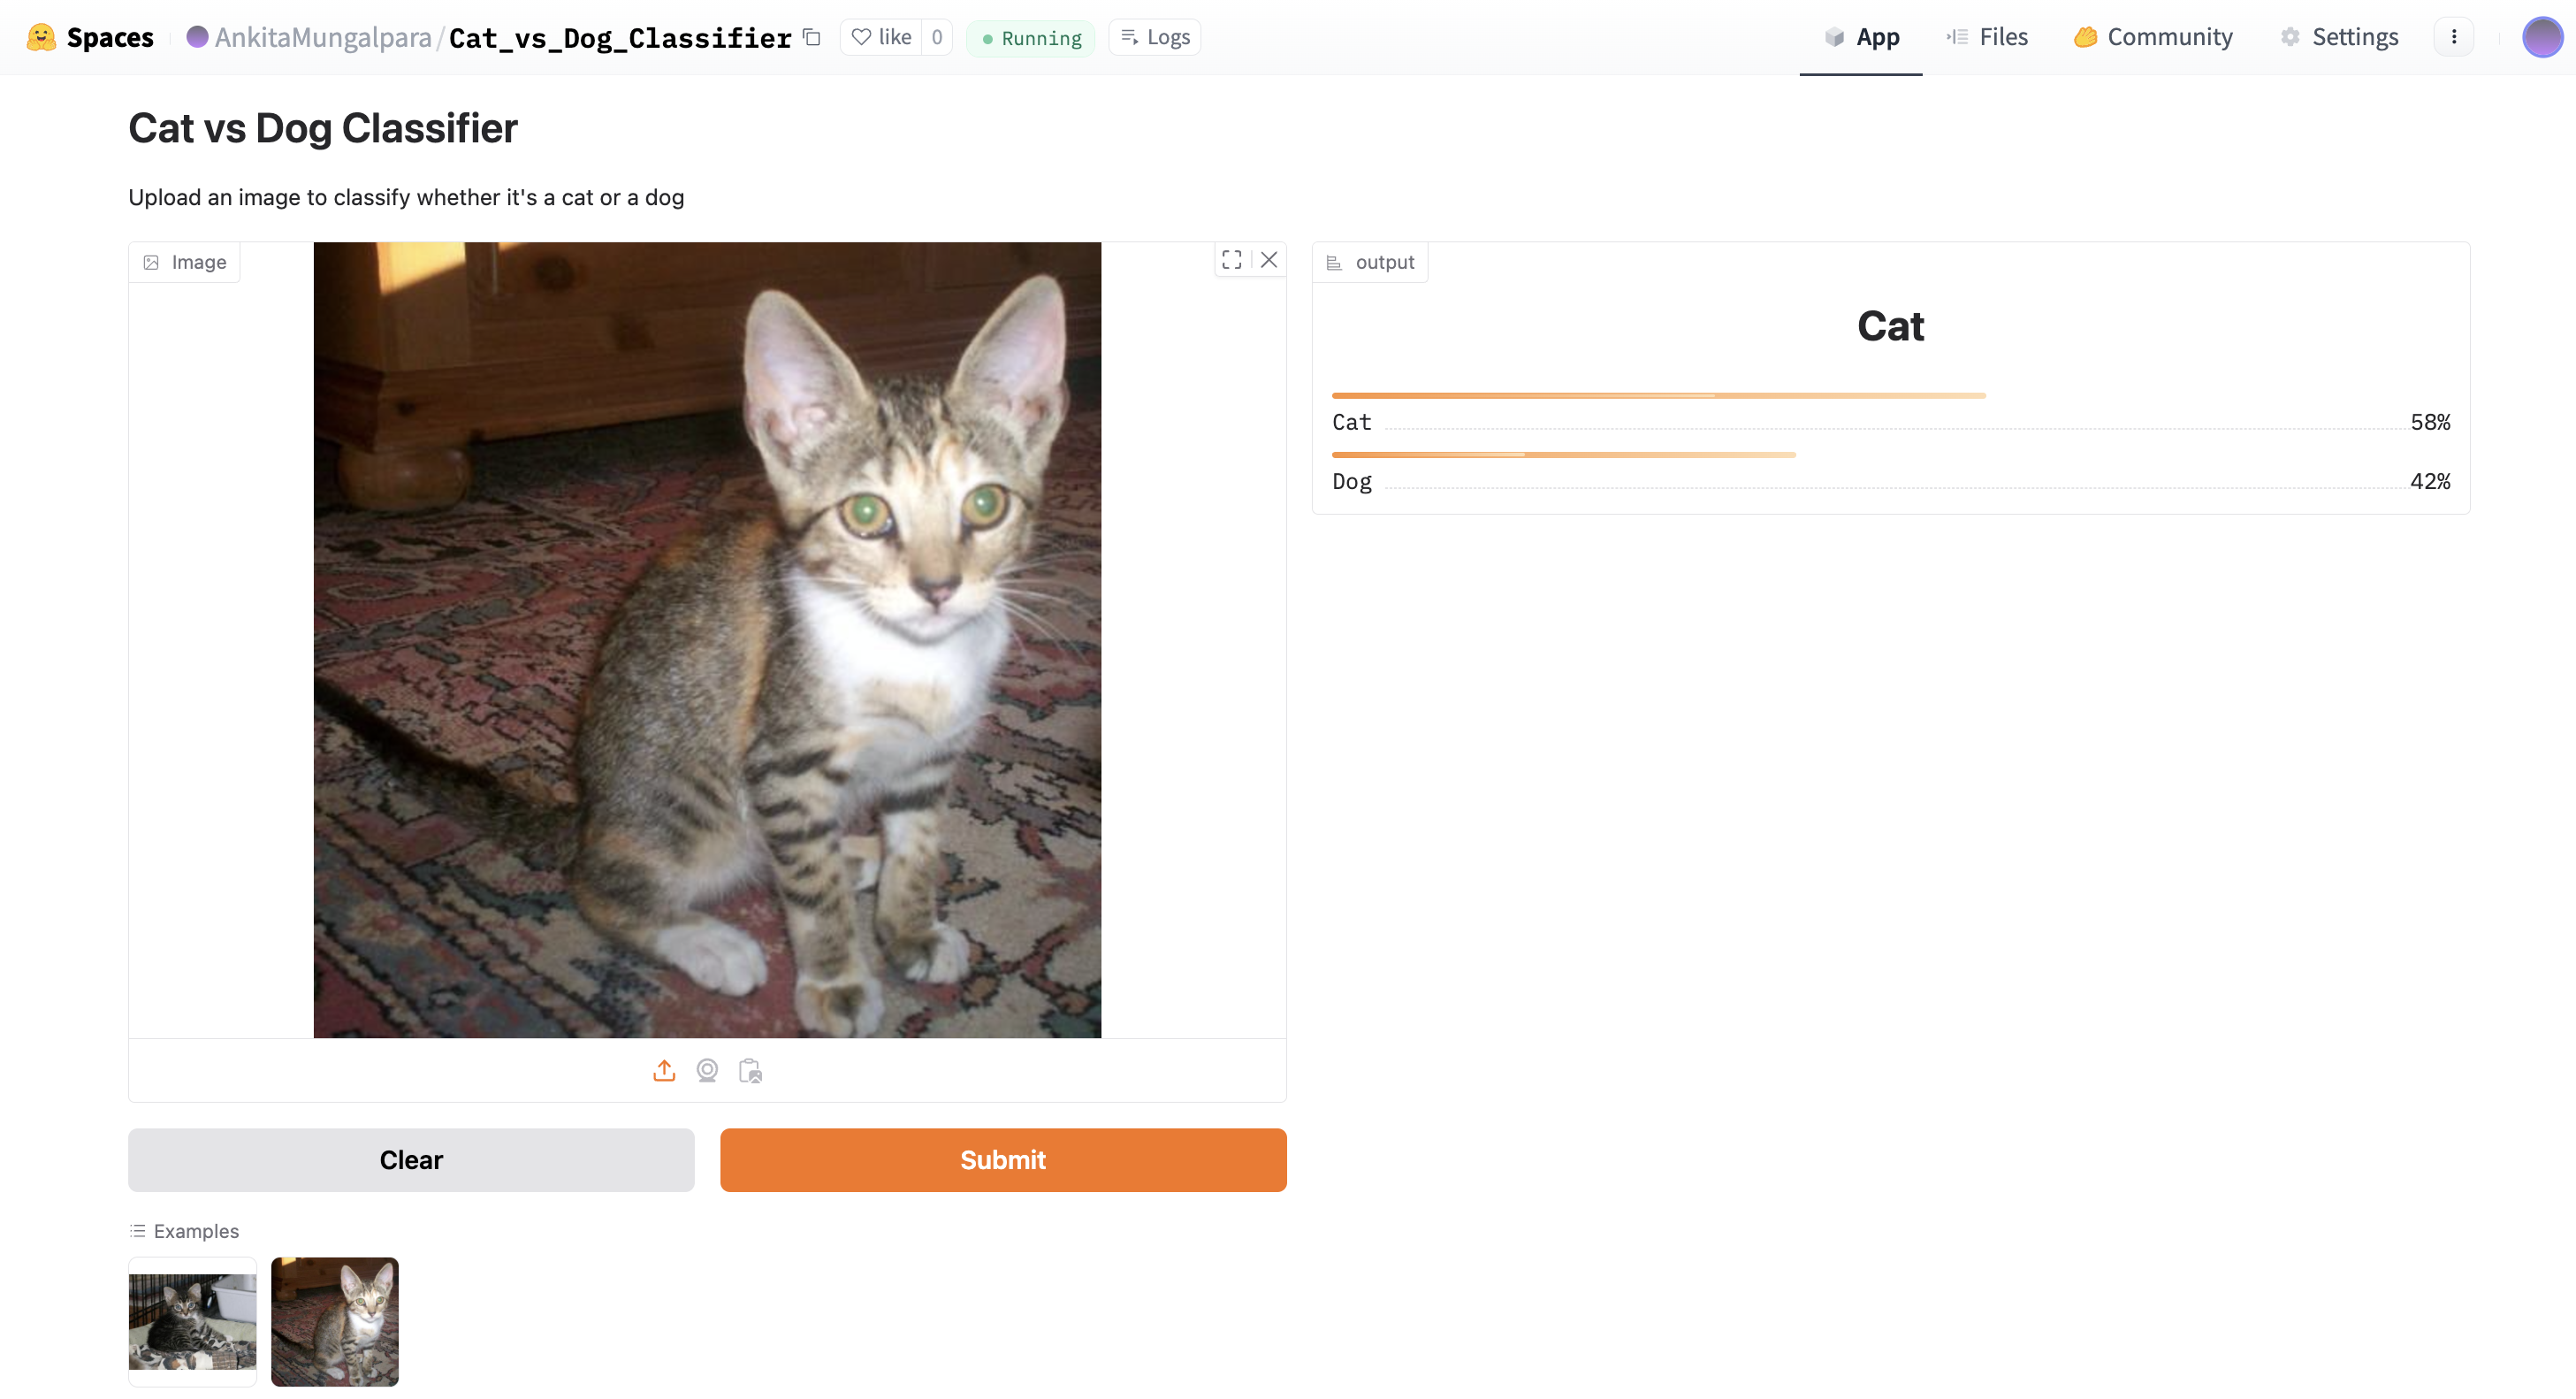
title="Cat vs Dog Classifier",
description="Upload an image to classify whether it's a cat or a dog",
examples=[
["examples/cat.jpg"],
["examples/dog.jpg"]
]
)
if __name__ == "__main__":
demo.launch()
Run the Gradio app:
python app.py
4. Deploy Gradio App
To deploy the Gradio app publicly:
-
Add demo.launch() in app.py:
demo.launch(share=True) -
Launch the app, and a public URL will be generated.
Alternatively, we can deploy the app to a cloud provider such as Hugging Face Spaces or AWS.
Directory Structure
gradio/
│
├── README.md
├── app.py                    # Gradio app script
├── model.pt                  # Traced TorchScript model
├── requirements.txt          # Dependencies
├── examples/                 # Example images
│   ├── example1.jpg
│   ├── example2.jpg
Result: